Kensington Concierge & Lifestyle Management
  • About
  • Services
    • Concierge & Assistant Services
    • Design & Styling Services
    • Event Planning Services
  • Policies

Reinventing the Backpack: A BackPack for iMac

10/2/2013

0 Comments

 
Picture
Picture
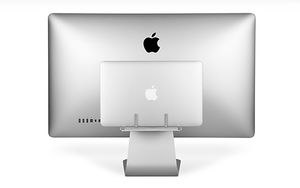
One of Kensington's favorite organizational products, often infused into our client's homes & offices, is the "BackPack" for iMac. The BackPack, made by Twelve South, is the perfect place to park portable hard drives, hubs or other USB peripherals you want to hide, but need easy access to. The integrated built in cable management will keep you cables in place - no more watching your power cable slip to the floor when you unplug. You can even tie the extra length of cable to the BackPack rails to keep things super tidy. When you bring your hard drive back to your Mac, your cables are ready and waiting.

While the days of sporting a traditional backpack over your shoulder have passed, Twelve South's BackPack for iMac is fresh, innovative & cool. As experts in the world of chic de-cluttering, we give this device an iApprove!

To learn more about the BackPack, or to purchase, click here.
0 Comments

Out of Sight, Out of Mind: 4 Ways to Hide Your Cable Box

9/22/2013

0 Comments

 
Picture
We all have one, and we most likely all hate the look of it - I'm talking about the ugly, yet necessary, cable box.  While it serves a solid purpose, it does so in a terribly unattractive manner. If only it looked like a cut crystal vase, or an artistic coffee table book, we'd be welcoming to placing it atop our lovely furniture - unfortunately it doesn't!  In an effort to help beautify our clients homes, I've created a list of 4 innovative ways to hide this common eyesore (and other electronic boxes, e.g. printers, routers, modems, etc.):
  1. Hide it in a Drawer/Transform the Drawer Front:  Shown in Photo 1 below, this concept is a fabulous way to hide electronics of various sizes (even printers).  Simply drill a hole in the back of your sideboard/dresser/etc. and pop your device inside running the cords out the back.  Carefully saw the drawer front apart from its interior sides & add hinges; this will turn your drawer front into a pull-down cabinet front. Based upon personal experience, piano hinges or 175 degree spring hinges work best in this application. Often times when using a piano hinge, a magnetic catch latch may be required to keep the cabinet front from falling.
  2. Create a Custom Cover for the Box: Shown in Photo 2 below, this concept is not for those faint of a D.I.Y. challenge. Head to your local hardware store & pick-up wood to create a 4 sided box frame (3/4x3/4" wood is ideal), wood saw, decorative metal sheeting, tin shears, regular & liquid nails. If you're bold enough, pickup a mitering box too.  Create the wood frame by hammering your wood pieces together (leaving the bottom & back open), then cut the decorative metal sheeting to the size of your frame.  If you have a miter box, mitering the corners of the wood will help to align the corners together ensuring a clean edge.  Next, glue the metal sheeting to the 4 visible sides of the box (wipe away any excess glue so it doesn't ball up, thus causing another eyesore).  Since decorative sheeting is generally silver, a coat of spray paint may be necessary to match it to your room decor.  Slide the cable box within the designed box and whala, you're eyesore is now a beautiful conversation piece. 
  3. Infrared Receiver Extender: One of my favorite finds in the recent year is the Infrared Receiver Extender. This tiny item eliminates the need for your cable box to sit near the TV.  To implement this item in your home, simply hop online & search "infrared receiver extender" + "your cable box make & model number".  Once you've found & received a compatible model, stick the bubble/dome-like end onto your TV front while plugging the opposite end into your cable box (which you've strategically hidden out-of-view). Now, your TV remote will work when aiming it at the sensor vs. the cable box itself. Isn't this device pure genius?!  I think so. . . 
  4. Hardback Book Covers to Hide Electronics: Believe it or not, most TV & Internet signals are strong enough to carry their signal through thin blockages.  Shown in Picture 4, a hardback book cover casing was created to disguise a cable modem or box.  In order to achieve this look in your home, gather up unused/unwanted books & create a nice looking grouping (standing side-by-side). With a razor blade, cut along the interior corner of each book allowing for the shell of the book to fall loose from its pages. Next, cut along the side edges of each book's spine, thus leaving the spine as a single entity. Be sure to save 1 right-side edge & 1 left-side edge, so your cable-box cover has sides. Now, with your spines laid out side by side, apply a layer of Liquid Nails to the meeting point of each spine. Before you know it, you will have created a one-of-a-kind 3-way cover for your electronics.
Hide your printer
PHOTO 1: Photo from apartmenttherapy.com
Hide your cable box
PHOTO 2: Photo from raisinguprubies.blogspot.com
Infrared Extender
PHOTO 3: Infrared Receiver Extender
Picture
PHOTO 4: Hardback Book Covers
0 Comments

A Clean Desk is the Key to Productivity

9/18/2013

0 Comments

 
Picture
There never seems to be enough hours in the day (hence Kensington's creation), right?!  When you're feeling frustrated & concerned with the inability to check-off your entire checklist, you don't always have to call in reinforcements (Kensington = Reinforcements).  While it may seem like the last thing you have time to do, make time to clean your workspace.  Often, research has shown, a clean workspace will make for fewer distractions & allow for your projects to get completed in a timelier manner.

Follow these steps to achieve a workable workspace

Photo compliments of innovativelyorganized.com
1. De-clutter the Computer:  This step is a two-parter.  Part One means to actually clean off the physical computer (remove sticky notes, wipe the key board & screen, etc.)  Removing the visual distractions on your hardware will, over-time, add to your time spent on what's most important when working - work!  Part Two of this step is to clean up your computer's desktop.  In an effort to save time, don't spend too long on this step.  Start by creating a computer file labeled "Desktop" and fill it with everything that is currently on your desktop (docs & applications alike).  Remove all other items from your desktop visibility so you've got a clean workspace.  *I personally like to add a solid, minimally distracting, background and/or screensaver (think solid white, light grey or light blue) so my screen is clean & serene looking. This helps me to embody these emotions, even on the most stressful of days.

Files for Organizing
2.  Create 2 Piles for Organizing: The 2 piles you'll be creating are called "NOW" & "LATER". . . 
     - Lets start with your "LATER" pile: Begin to collect all the items from your desk which are associated with completed tasks and/or tasks without a deadline.  Stack these items together & pop them into a file cabinet, box or bag nearby (see picture on right for example).  
     - Now, to the "NOW" pile: Collect anything that pertains to projects with an upcoming deadline, and/or projects you're currently working on.  When collecting these items, place them with like papers/documents and file, or stack them accordingly.  Next, place your most urgent items at the top of these documents so you have a grouping of items with most urgent to least urgent (this will help to guide you throughout the day). *If you'd like to go a step further, create labeled project file folders which hold all of said documents.

Desk Reduction
3. Reduction:  Take a look at the personal items in your space and begin to eliminate what you can.  Invest in 1 picture frame which holds multiple pictures, or a cork board above your desk to hold your pictures nicely & neatly in one place, so you're desk is minimally cluttered with photographs.  Also, do you have pens located in your desk drawer & laid amongst desktop?  If so, reduce these down to one location. Choose one space & commit to keep to it (I recommend keeping all writing utensils in a nice jar/cup located atop your desk for the ease of quick grabbing).  Do you have 3+ pads of paper floating on top of your desk or within your top drawer?  If so, lose two (preferably to a file cabinet or storage drawer nearby), and keep one handy.  You'll never lose important notes if they're all stored within one pad of paper.

4. Keep it Up: When a project ends, although you feel the pressure to move immediately onto the next, cycle through these methods (if you keep it up, this step will take mere minutes).  Move your completed projects papers to the LATER pile and do a once-over on your desk to make sure its in perfect un-cluttered order.

5. Got a Second?:  Whenever you've found yourself with a second to spare (whether the boss is M.I.A. or you're on an annoying overseas 40 minute phone-call hold), tend to your "LATER" pile or your computer's "Desktop" folder.  Begin sorting through this mess of items.  When cleaning up your "LATER" pile, create an organizational filing system (either physical or digital) for completed tasks & TBAT's (To Be Accomplished Tasks).  If you're sifting through your digital docs, be sure to start slow & tackle one project at a time.  For instance, start with pictures, and slowly sift through each item making sure to label & store it in its proper digital place. Continue this technique for all the documents in your "Desktop" file.  You'll be surprised, time will pop up randomly & organization will find its way into your life (generally, before you could ever force-feed yourself with it on a TTD list).

I'm a firm believer in surrounding yourself with serenity in order to feel serenity.  Its common practice to choose friends wisely because of their possible effect in your life - so why not carry this same methodology into the spaces where we spend an abundance of time?  While we may not have the opportunity to decorate the entire corporate office, take control of what you can - your cube, your desktop, your laptop, etc.

If you'd like assistance with your organizing endeavors, please contact Kensington at (312) 204-7332.  Please add questions to the comments section below - we'll be sure to answer quickly!
0 Comments

tip of the day: Wax Paper for Your Closet

9/7/2013

0 Comments

 
Don't you hate when your hangers won't slide across the bar in your closet, thus clothes fall off and can sometimes tear?  Its the worst! Well, if you can relate, need not fret . . .we've got your solution!
Wax Paper
Wax paper.  Yep, THAT wax paper; the one you have in your kitchen.  Simply grab a piece (I'd suggest approx. 8.5" x 11"), wad it up in a ball (waxy side out), and rub it along the top of your closet rod (back & forth a few times).  This will coat your closet rod with a thin layer of wax and cause your hangers to slide blissfully along the bar.  

Please note that this works best on metal closet rods.  Unfortunately this application does not work for rubber coated rods.
0 Comments

15 Innovative Jewelry Storage Ideas

9/7/2013

1 Comment

 
As a woman who loves to collect baubles and all things shiny, I’m often perplexed about how to organize my goodies.  Take a peek at my favorite 15 ideas for jewelry organization.  Hopefully you can implement one of these ideas into your home.

1.  Strategically place an antique tea set atop your dresser and fill with your most precious jewels.  The uniqueness of the tray and tea set will set the tone for the beautiful jewels that sit stored inside each piece.

Photo compliments of shelterness.com
2.  What great idea…use a cheese grater for your earrings!
Photo compliments of houselogic.com
3.  Use an antique dressform to add some style to your room and drape her with your favorite necklaces.  You can also pin a couple brooches into the bust for added storage.
Photo compliments of confettistyle.com
4.  Buy a towel bar or short curtain rod & add “S” Hooks to it as method of organizing your necklaces.  It's clean, simple & an inexpensive solution to your jewelry organization needs.
Photo compliments of confettistyle.com
5.  Picture Perfect!  Utilize some of your unused wall frames as a creative way to display your jewels as wall-art.
Photo compliments of artbeadscene.com
6.  Au Natural.  Take a piece of nature (branches from your back yard…or your local Michael’s store), pop into a vase and hang your jewels- its simply beautiful.
Photo compliments of inspirebohemia.com
7.  Pop into the hardware store and grab a handful of drawer pulls (Anthropologie also has an incredible selection of vintage-inspired hardware).  Screw the pulls into a backer-board (perhaps a piece of wood covered in burlap) and use the pulls as earring displays.
Photo compliments of confettistyle.com
8.  Similar to #7, use knobs as a means to hang necklaces and bracelets.
Photo compliments of confettistyle.com
9.  Stop throwing away those cardboard egg crates and put them to good use!  We’re in love with this idea – its green and super inexpensive…
Photo compliments of shelterness.com
10.  Another inexpensive tray-style organizational idea is the use of a painter’s tray.  Pick one up at your local art-supply store for only a couple dollars & fill with your bling.
Photo compliments of confettistyle.com
11.  Similar to #5, use small table-top picture frames to display your earrings.  String a short piece of fishing line or chicken wire across the frame & decorate with drop earrings.  You’ll have to remove the back of the frame and lean the frame against the wall.
Photo compliments of shelterness.com
12.  Pick up some colorful bowls, place in a drawer or atop your dresser/nightstand for a simple and practical jewelry solution.  I like to assign one for rings, a few for bracelets and use #8 for my necklaces.
Photo compliments of shelterness.com
13.  Put a cork in it and drink! Host a dinner party and put the remaining empty bottles to good use.  Take an old frame, fill with corks (hot glue will be your best friend in this project) and slide your post earrings right into the supple cork.  What a fun idea!
Photo compliments of confettistyle.com
14.  Hang it with style.  Use an old fashioned hanger to hang…jewelry.  This solution works great for necklaces you can unhook and clasp around the bottom bar of the hanger.  Its streamlined and can hang directly in your closet if you’re short on space.
Photo compliments of shelterness.com
15.  Pull from the kitchen and utilize your muffin tins for a crafty storage solution.
Photo compliments of shelterness.com
1 Comment

    RSS Feed

    Author

    Penned by Kensington Staff

    Categories

    All
    Beauty
    Chicago
    Closet
    Clothing
    D.I.Y.
    Fitness & Sports
    Health & Wellness
    Interior Decorating
    Kitchen
    Organizing
    Recipes
    Recommended Businesses
    Style
    Tip Of The Day


    Enter your email address to subscribe to this blog:

    Delivered by FeedBurner


    Follow on Bloglovin

    Chicago Blogger Network

Powered by Create your own unique website with customizable templates.